


Creating a DIY Shoe Rack is easy and can make your home more organized. You just need a few materials and some basic woodworking skills. This way, you can make a useful storage spot.
Having a special place for your shoes keeps your home neat. It also makes it easier to find the right pair. Many people use edge-glued panels, plywood, or MDF for this woodworking project.
Doing this project improves your Shoe Storage and gives you a sense of pride. It’s a good start for woodworking or to tidy up your living area.
Why You Need a Shoe Rack at Home
Having a shoe rack at home is more than just a storage solution. It’s a step towards a more organized living space. A cluttered home can be overwhelming, and shoes scattered around can make it worse. A shoe rack helps keep your shoes organized, making it easier to find what you need.
A shoe rack is an effective tool for Home Organization. It keeps your entryway or closet tidy, setting the tone for the rest of your home. By keeping shoes in one place, you reduce clutter and make your daily routine more efficient.

Also, a shoe rack is a great Shoe Storage solution. It protects your shoes from damage by keeping them off the floor. This keeps them looking their best and prolongs their life.
Plus, a shoe rack helps with Clutter Control. It provides a designated place for your shoes, stopping them from being scattered around the house. This keeps your home cleaner and more organized.
Practical Benefits of a Shoe Rack
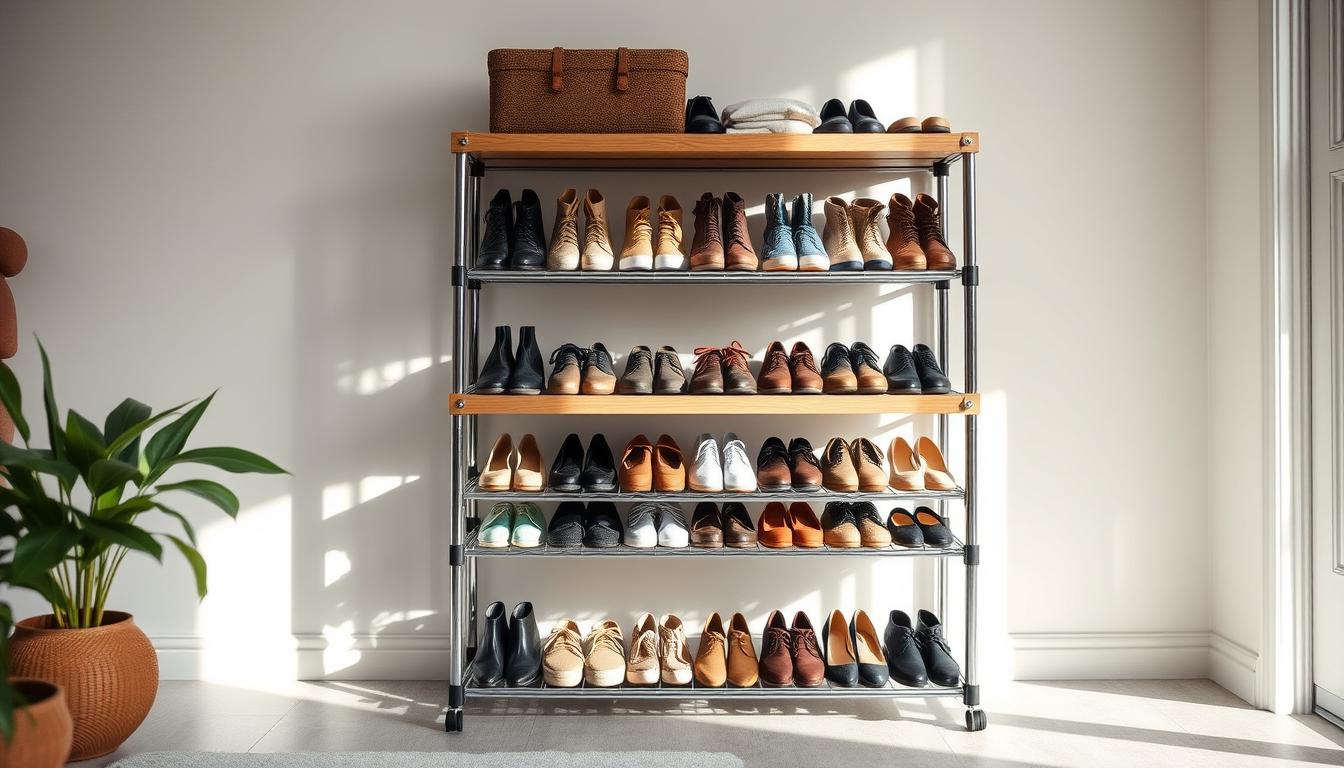
A shoe rack can be a versatile addition to your home. It serves not just as a storage unit but also as a decorative piece. You can place it in various locations like the entryway, closet, or bedroom, depending on your needs and space.
By choosing a shoe rack that fits your style and needs, you can enhance your home’s organization. It also adds a touch of personal style. Whether you’re looking to simplify your morning routine or just want a more organized living space, a shoe rack is a simple yet effective solution.
Materials You’ll Need for Your DIY Project
To build a sturdy shoe rack, you’ll need to prepare a list of required DIY Materials and tools. The main materials include edge-glued panels and plywood. These provide a solid base for your shoe rack.
For the frame and shelves, use wooden boards like 1×12 and 2×2 boards. They are versatile and can be adjusted to fit your shoe rack’s size.

When it comes to hardware, T-nuts and pocket hole screws are key. T-nuts secure fastening, and pocket hole screws make assembly easier.
For Woodworking Tools, you’ll need a circular saw for cutting, a drill for screw holes, and a pocket hole jig for strong joints.
Having the right Shoe Rack Materials and tools makes building smoother. It also ensures your shoe rack is durable and functional.
Step-by-Step Guide to Building Your Shoe Rack
We’ll show you how to build a simple shoe rack. It’s a fun DIY project that keeps your shoes organized. With the right materials and instructions, you can create a functional and stylish shoe rack that fits your needs.
To begin, you’ll need to make the frame of your shoe rack. Cut the wood to size and get it ready for assembly. It’s important to double-check your measurements to avoid mistakes during assembly.
Drilling Pocket Holes and Assembling the Frame
Drilling pocket holes is key to assembling the frame. You’ll need a pocket hole jig for this. Using a pocket hole jig ensures that your screws are countersunk, creating a clean and professional finish. After drilling the holes, you can start putting the frame together with screws.

Once the frame is built, attach the sides and back panel. Make sure everything is aligned well for a sturdy rack. Use clamps to hold the pieces together while you screw them into place. This helps prevent any mistakes and ensures a strong bond.
By following these steps and using the right techniques, you can make a sturdy and functional shoe rack. Don’t forget to sand your shoe rack before finishing it. This will make the surface smooth.
Adding Shelves to Your Shoe Rack
Now that your shoe rack frame is set, it’s time to add custom shelves. You’ll need spacers to hold the shelf in place and attach it to the side panel. This makes sure your shelves are stable and last long.
Many DIY fans like to make shoe racks with adjustable shelves using MDF and wooden sticks. This method is great because it lets you store different sizes and styles of shoes.

To start, measure the space between your shoe rack’s side panels. Cut your shelf material to fit perfectly. Then, use spacers to place the shelf right and screw or nail it to the side panels.
Adjustable shelves offer a shoe storage solution that you can customize. Whether you have high heels or sneakers, these shelves can be adjusted to fit your shoes just right.
Adding custom shelves to your shoe rack makes it both functional and stylish. It can really improve the look of your entryway or closet.
Personalizing Your Shoe Rack
With a few simple tweaks, you can turn your shoe rack into a customized storage solution. It will not only serve its purpose but also match your home decor.
One easy way to personalize your shoe rack is by painting or staining it. For example, using a Provincial color wood stain can give it a warm, rustic look. To keep the finish looking good, add a Polycrylic top coat. It makes the finish durable and shiny.
When it comes to Shoe Rack Design, you have endless options. You can pick a design that fits with your furniture or make it stand out. This way, your shoe rack can be a highlight in your home.
Customization Ideas can be simple or complex. To make it more personal, you could add decorative trim, unique hardware, or personalized labels. The goal is to let your creativity show and make your shoe rack fit your style and needs.
By focusing on Personalized Storage, you can make your shoe rack both functional and stylish. Whether you like a simple look or something more detailed, the right touches can make it a beautiful part of your home.
Maintenance Tips for Your Shoe Rack
To keep your shoe rack in top shape, follow some easy maintenance tips. Regular care will make it look great and work well.
Start by cleaning any glue that spilled during assembly. This stops it from drying hard to remove. Also, a bit of floor wax on sliding doors makes them move smoothly.
Keeping your shoe rack tidy is important. Organize your shoes by type or how often you use them. This keeps things neat and makes finding shoes easier.
By using these maintenance tips and taking good care of your shoe rack, it will last longer. It will also keep serving you well.
Creative Shoe Rack Ideas
With a little creativity, you can make a simple shoe rack stand out in your home. DIY Projects like building a shoe rack are a great way to get creative with Creative Storage solutions.
One cool idea is to use MDF and wooden sticks to make a unique shape, like the word “SHOE.” It’s not just a place to store shoes; it’s also a decorative piece. Making your shoe rack fit your style and needs can really improve your home’s look and organization.
When thinking of Shoe Rack Ideas, think about the space you have and the style you want. Whether you like simple designs or something more detailed, your shoe rack can show off your taste. Adding DIY Projects can make your storage solutions even more personal.
Exploring different materials and designs can lead to a shoe rack that’s both functional and decorative. So, start brainstorming and plan your next DIY Project!
Where to Place Your Shoe Rack
Finding the perfect spot for your shoe rack can make your home more organized. A well-chosen location for your shoe rack keeps your shoes tidy. It also helps keep your living space free from clutter.
Experts say a shoe rack works well in closets or entryways for easy shoe storage. Putting it near an outside door is smart too. It makes getting in and out easier and keeps the area clean. As one source points out, “a shoe rack is a practical addition to any home, serving as a centralized location for shoe storage.”
Think about your home’s layout and where you usually put or wear your shoes. For example, a shoe rack near your closet or in a mudroom is very useful. Make sure your shoe rack matches your home’s style and decor.
“A clutter-free entryway sets the tone for a well-organized home,” say home organization experts. Adding a shoe rack to your entryway can greatly improve your home’s look and organization.
Conclusion: Enjoy Your New Shoe Rack!
Building a simple shoe rack is a fun DIY project. It brings DIY Satisfaction and improves Home Organization. Now, you have a clutter-free space and easy access to your shoes.
By following the steps in this article, you’ve made a functional piece of furniture. You’ve also enjoyed the joy of creating something with your own hands. Your shoe rack is now a valuable addition to your home, keeping your shoes organized and your entryway tidy.
As you enjoy your new shoe rack, think about other DIY projects. They can help you further enhance your Home Organization and storage. With each project, you’ll gain confidence and experience the satisfaction of creating a more organized and functional living space.